Sunday, December 29, 2013

Helloooo...anyone out there?

I think I've pretty much discovered that I'm an old lady trapped in a younger body.  Let's examine the facts: 

1) I love cooking & baking in all forms.
2) I sew A LOT. 
3) I love gardening (when my dogs don't tear my yard up). 
4) I have cancer (ok ok...so this has to do with my body, but basically I think my body is trying to catch up with my mind.) 

I have been in a paper piecing (foundation piecing) mode lately where I have been creating paper piecing patterns.  I taught myself how to make these patterns with free computer program that is available out there. I have a million ideas, but limited time sadly. 

I love this method for quilting! If you can count...and you know your alphabet...and you can sew straight lines (and you can read...which I'm assuming you can since you're on my blog) YOU CAN PAPER PIECE! 

I LOVE THIS METHOD

Miss Enota (aka Kristin) at Mpls. Modern Quilt Guild couldn't have said it any better here!  

Here's the patterns I have finished so far.  All are available in my Etsy Shop or my Craftsy shop

I have created patterns for temples by request or out of necessity.  My niece will be getting married on February 14th and I have pieced this together for her and still need to finish it as a wall hanging.  
For the Beautiful KK. Who will soon be the beautiful KC.

Brigham City Temple

Gila Valley Temple

Thanksgiving Pilgrims 

Out of curiosity I wondered...is there anyone else out there that likes paper piecing and creates their own patterns?  And...THERE IS! 

Kristy @ Quiet Play has some beautiful patterns (here kitchen item themed patterns are my favorite and very inspiring!) 

Kristin from Fave Crafts Blog gives an excellent beginners tutorial

Generations Quilt Patterns offers some free patterns. 

Of course, there's always one of my favorites Paper Panache.  I've done a couple of her patterns! Love them!

Fandom In Stitches is a great page as well.  I've used their patterns before, too! 

Needles and Knowledge has a great pumpkin tutorial that would be beautiful for Thanksgiving! 

The Sometimes Crafter tried a block that turned out beautiful!

I'm still searching for more blogs and fellow paper (foundation) piecers!  

Comment with links to sites if you know of any! 

One more...one more! Sylvia over at Sylvia's Stitches may have become my new favorite! She paper pieces and she is a CANCER SURVIVOR!  You amaze me! Talk about encouraging to hear of a cancer survivor! Thanks for the inspiration!  


Sunday, December 22, 2013

How the Grinch Crinkled Christmas Cookies--From Scratch

Kudos to Cookin' Cowgirl for an awesome recipe for How the Grinch Crinkled Christmas Cookies.

I don't buy cake mixes.  I learned that if I buy cake mixes, they just sit in my pantry and expire or get weevils.  Did I mention that when I was pregnant with Buddy someone brought us the most delicious cake balls made from a cake mix?? I took a big bite of my 3rd one and thought that I felt something strange in my mouth.  I quickly spit it out to find the FATTEST weevil I have ever seen in my life. Because I was pregnant, I wanted to vomit. I lived, but it scarred me. (just kidding--sort of)

 Here's my take on the Grinch Cookies. No cake mixes allowed!


Crinkled Grinch Cookies
2 C. all-purpose flour
1 1/2 C. white granulated sugar
1 Tbsp. baking powder
1/4 tsp. salt (if using unsalted butter, use 1/2 tsp. salt instead)
1/2 C. nonfat dry milk
8 Tbsp. butter, melted
2 eggs
1 1/2 tsp. vanilla extract
Green food coloring (amount of choice--I used about 30 drops of chartreuse, 40 drops of green, and 6 drops of blue)--leave the food coloring out if you don't care if they're green!

1/2 C. powdered sugar
1/2 tsp. cornstarch

Preheat oven to 375 degrees F.

Mix flour, sugar, baking powder, salt, and non fat dry milk in a medium sized bowl. Add melted butter and beat with a hand mixer until the butter is somewhat evenly distributed. Add the eggs and mix until the texture is even throughout. Add the vanilla and mix again. Next, add the green food coloring until the dough has a nice even color.

Combine the powdered sugar and cornstarch in small bowl.  Roll balls of cookie dough (about 1 Tbsp. each) and roll them in the powdered sugar/cornstarch mix.  Place on greased cookie sheet (I also used parchment paper) and bake for about 8-9 minutes.

Allow cookies to cool for about 1 minute on the cookie sheet and then transfer to a cooling rack until completely cooled.

Enjoy!


Another ultrasound

Ten loves our snowman. 


I was scheduled for another ultrasound guided biopsy yesterday.  I was really nervous.  My last ultrasound showed some atypical lymph node activity.  My lymph nodes were enlarged.  I DID have a sore throat and wasn't feeling well when I went for my last ultrasound, so I was hoping that had something to do with it.  But I was still nervous!
Buddy was fascinated by the mailbox with my name on it.
He thought it was a garage for his cars :) 


When you arrive, they always start with an ultrasound to just see what's going on first.  The ultrasounds take forever (or so it seems).  They gel your whole neck up (which makes for a sticky gooey neck for the rest of the day even if you try to wipe it all off.) If you've never had an ultrasound wand gliding over your jaw bone or your collar bone repeatedly, you're missing out! The particular ultrasound tech I had yesterday kept making weird faces.  Judging by the look on her face, either there was some pretty weird stuff going on in my neck, or she needed glasses--had to be one of the two.
Look at that professional! 
Long story short, my lymph nodes look the same or better than the last ultrasound that I had.  But, the radiologist wasn't sure how aggressive my doctor wants to be.  So, he's going to talk to her and then if I need a biopsy, I will have one another day.

Life has been pretty crazy the last few days.  I went to JoAnn's with the two kids.  Yep! I'm crazy! To top that off, both kids started throwing up last night.  We had a long first part of the night, but ended up getting about 6 straight hours of sleep.


The star!
Ten has a talent for undecorating trees...
which will come in handy at some point I'm sure! 
Early morning timer picture! We love Christmas!

Wednesday, December 18, 2013

Whole Wheat--Healthier for you tortillas


Here's my tutorial on making homemade tortillas. This recipe can be done many different ways.  I will try to include any/all variations I have ever tried. Please comment and let us know if you try anything different and how it turned out! FULL RECIPE IS AT THE BOTTOM!


If you're sensitive you may need a pair of ear muffs...I warned you! lol
Blendtec Kitchen Mill. It's loud (but aren't they all?) but not as loud as some I've heard.  It works great, but works better if you take the filter out and replace it every so often while grinding. The filters can we rinsed in water, but have to dry completely (like 24+ hours before you use it again). Mine came with 5 or so, so that's not an issue.


When I quadruple the recipe it BARELY fits in my BOSCH mixer. BUT IT FITS! I used to have a "Champ" mixer similar to this one on Amazon and it only fit 3 times the recipe.  But, I find that tortillas are best made in large batches! They go quick at my house! So if I make them...I might as well MAKE THEM (if you know what I mean)!


Step 2 : Measure out your wheat flour (16 C.). Baking powder (1 tsp). and Salt (1/4 C.)---I know that seems like a lot of salt, but it's not!

See how full the Bosch is already?
Stir that all up! 

Step 3: Add the applesauce (2/3 C.) and oil (2/3 C.)  The original recipe calls for 1 1/3 C. of oil or shortening or lard.  I LOVE LOVE LOVE lard in my tortillas, but when I'm trying to go healthier, I use half applesauce and half olive oil.  
If you measure the oil first, the applesauce just "slips" right
out of the measuring cup! I love that!

I know what you're thinking..."APPLESAUCE!!! IN TORTILLAS???" 

Just trust me on this.  They are great!

NOW-Mix that all up until the oil/applesauce is thoroughly distributed throughout.

Step 4: Add warm water (7 C.) all at once.  You will need your Bosch ring and lid for this step.  Or you will need a mop and rags and kleenex (for all the tears you will shed)...your choice really.

Once the water is added, attach the lid and mix until the dough is a consistent texture throughout.  


Here's mine! 
The dough is going to be STICKY STICKY STICKY! That's why the rings have got to come off!


Step 5: Get greased up! The more oil/shortening on your hands the better! The dough is ready to be divided.  Because I quadrupled it, this recipe should make about 64 tortillas. If you like, you can divide the dough in half, and then divide each half in half, and so on and so forth.  I prefer to eyeball it. But, I've done this many many times. This time I only got 54 tortillas out of the recipe, but they are bigger!


Use your hands to form balls (but be warned, when they are set down, they are too squishy to hold their shape well). Make sure they are covered in a nice coating of oil/shortening/lard (whatever you use). Re-oil your hands OFTEN! I can't stress the importance of oiling these babies enough! Set on cookie sheets (or wax paper if you prefer less dishes), cover with a dish towel, and LET THEM REST for about 10 minutes or so.


Look at those lazy things! 
Step 5: After you have preheated your CucinaPro Flatbread and Tortilla Maker (yep! I'm a cheater! And this bad boy is worth EVERY PENNY).

Place one "ball" at a time just slightly towards the back of center close the lid and press down with the bar slowly yet firmly. Don't press too hard...you will blow holes in your tortilla, but don't be too soft either or your tortilla will be too thick.  This will take some practice.  Pay attention to the sounds the dough is making (I like to call it a whistle).  The sound helps me judge when I've pressed enough. White flour tortillas take a lighter hand.  Wheat tortillas take a bit more muscle.


Remove your tortilla from the heat and stack on a towel to cool down.  


Your tortilla maker will look like mine when you're done.  Clean as directed in your instruction manual. It's not hard to get clean though, it's surfaces are non-stick.


(Notice the crockpot? That's pinto beans. Homemade refried beans and homemade tortillas...yum yum!)


These tortillas are still considered "raw" but by if you feel the need you can eat them, nothing in them needs cooked.


I usually freeze/refrigerate my tortillas raw.  In order to do this, you will need to spray in between each tortilla with cooking spray (Pam) to allow easy separation when you're ready to cook them (you only need to spray one side and put sprayed side of one to raw side of the next). Then, I store them in zipper bags and pull them out of my freezer as needed.   


To cook them, I use a cast iron skillet.  Tortillas need a lot of heat to cook correctly.  I let my skillet heat up for a few minutes before cooking.


To give you an idea of how hot I get my skillet: my range goes from 1 to 9 plus has a "high" setting.  I heat the pan up on 8. Sometimes, if I'm cooking a lot of tortillas, I will have to turn it down to 6 1/2 or 7.


The tortillas should only take a brief amount of time (less than 20 seconds) to get the little dark brown spots you usually see on tortillas.  Once those spots show up, flip to the other side.  The 2nd side should cook even faster.


Enjoy!


Here is the full recipe:


Single Recipe (Mixed by hand):
4 C. Flour (white or wheat)
¼ tsp. baking powder
1 Tbsp. salt
1/3 C. shortening or lard or olive oil (if you use shortening, be sure to use Crisco brand, also note that you can use a mixture of oil and applesauce but I don't recommend replacing more than half of the oil)
1 ¾ C. warm water

Mix dry ingredients. Cut in shortening. Add water and knead by hand. Pinch into 16 golf ball sizes of dough. Let sit for 10 minutes. Roll with flour and cook on stove.


Quadruple Batch (Bosch Directions):
16 C. flour (white or wheat)
1 tsp. baking powder
1/4 C. salt
1-1/3 C. shortening or lard or olive oil 
(if you use shortening, be sure to use Crisco brand, also note that you can use a mixture of oil and applesauce but I don't recommend replacing more than half of the oil)
7 C. warm water

Mix dry ingredients in Bosch. Mix in oil (and applesauce if used). Pour in water all at once and mix until well combined. Dough will be extremely sticky. Dump out onto well oiled counter. Make sure your hands are well oiled. Split dough into four even parts. Split again and again until each of the original four are split into 16 balls. (64 total). Roll each ball in your well oiled hands. Place on an oiled cookie sheet or wax paper and cover. Let rest for 10-15 minutes. Heat opened tortilla press for five minutes. Place balls one at a time just to the back of the center of press. Close lid and handle with a firm and slow pressure. Cook for about 5-10 seconds. Open press and slide tortilla off onto a towel. When all tortillas are pressed and cooled, spray in between each tortilla with cooking spray (Pam) to allow easy separation when you're ready to cook them 
(you only need to spray one side and put sprayed side of one to raw side of the next). When ready to use, cook tortillas on a really hot griddle just like the ones you get in the grocery store in dough form. You can cook up a bunch at one time or freeze/refrigerate them raw.


***this recipe is a recipe I got from my sister. It is titled "Lollie's Tortillas." Lollie must be an amazing tortilla maker. YUM!

Monday, December 16, 2013

How the Grinch Stole Christmas


How the Grinch Stole Christmas (1966) by Francisiii' Enjoy this family favorite!

Sunday, December 15, 2013

Success!


Ps. 100 lbs of elk meat only filled up half of our cooler! The thing's a monster!

Wednesday, December 4, 2013

Coats, Rain, and Dinosaurs! And a cancer update!

Today was one of those days where you have 10 zillion things to do, but don't feel like doing ANY of them!

First, was getting out of bed...yikes I was tired!

Then, a little while later we were headed to the Favorite's and my little Buddy's favorite store of all time. Bass Pro Shop. But...the trip was specifically for me.  I have a COW ELK HUNT coming up this coming week! Am I excited...sort of.  I would say that I'm more nervous that I won't get one! I have cooked with elk hamburger instead of beef hamburger for over 2 years now.  When I taste beef, it tastes funny to me! I suppose you could say that I've gotten used to the all natural, lean meat that comes from an elk.  No artificial hormones or antibiotics in my meat!
1
Bass Pro in Arizona

We picked up a pair of hiking boots and a pair of gloves previously but had to order in a coat special for me.  They didn't carry any women's coats...just youth and men's. So, we ordered an XL youth coat in and a Small men's coat.  Both were great, but the youth coat won out (along with a thermal underwear top)! It was cheaper, although if I had an unlimited budget I would have picked the men's coat because it had WAY more features and was much warmer.

Wish me luck on my Elk hunt!

Then, we went to a DIFFERENT vacuum repair shop. They accepted the vacuum for repairs.  We will see if the recall was the reason it wasn't working! Much better customer service than the place I went to yesterday!

Then, I took pictures of a friends baby.  Then, I was supposed to have a play date at the park with some friends, but it started RAINING! And, I can't complain too much about that! It would have been fun to see friends, but oh well.

Lastly, I have been dreading packing.  I have been suffering from anxiety a lot lately.  Because today has been so so busy and because I am about to go hunting, I feel anxious. Thankfully, my husband has informed me that packing does NOT have to be done right this moment and that he will help me later.

So, what have I been doing this evening? Wrangling dinosaurs.  I read this book to the little Buddy this afternoon, and he's been acting like a dinosaur ever since.

I guess I never updated this blog with what course of treatment I have chosen for my thyroid cancer.  I went to Dr. P at MD Anderson Cancer center (after first seeing Dr. M, an oncologist and not feeling right about his recommendations).  I have chosen to go with Dr. P's treatment plan.  The plan entails me not doing radioactive iodine therapy YET.  Dr. P wants us to finish having our family first. We don't feel like we're done having kids.  My prognosis won't change.  I may just be setting myself up for more surgery.  As of right now, I am having ultrasounds on my neck every 6-8 weeks just to make sure everything is looking normal.

The last ultrasound I had showed enlarge lymph nodes (uh-oh). I have to go back for a follow up ultrasound guided biopsy very soon. Cross your fingers (but more realistically...PLEASE PRAY!) that everything is normal.  I think it will be.  I went in for the first ultrasound with a sore throat and feeling yucky which can definitely make your lymph nodes enlarged.

Only time will tell.

-Allison

Tuesday, December 3, 2013

Courtesy...not so common any more!

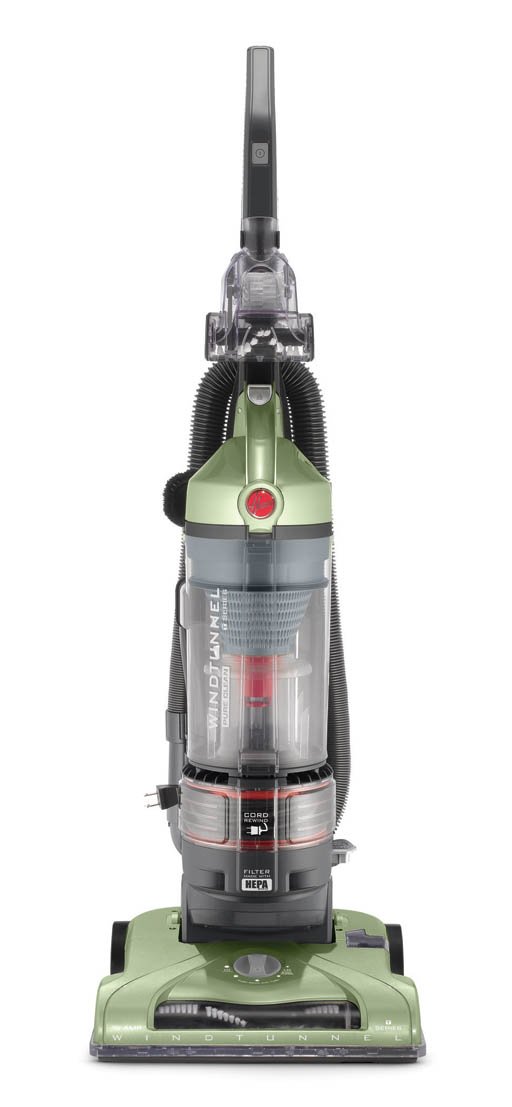
Today was interesting.  Let me set the scene for you. My vacuum is like this one:


A little history:
I have had this vacuum for 4+ years...I know this, because I bought it shortly after I married the Favorite (my husband).  

It's been a really great vacuum.  You really can't beat it for $99 (but I don't think it was $99 when I bought it!). But...I do have some gripes.  I really liked the cord rewind feature...at first. 

That was until my little Buddy joined our family.  That cord rewinder is the funnest thing you have ever seen! Loads of fun were had, UNTIL the cord was pulled out far past the red tape that was supposed to indicate that the limits had been pushed far enough! How is a 2 year old supposed to know that red means stop???

Not to mention that the cord must have been run over by the vacuum at some point so the rubber coating surrounding the wires has been nicked...but no wires are showing through...yet. The Favorite put some electrical tape on that spot...good as new RIGHT???? 

Well a couple weeks ago, my vacuum wouldn't even turn on. The Favorite took it apart but couldn't find the issue.  This is the point when we usually google it. 

Turns out: THERE IS A RECALL FOR OUR BATCH OF VACUUM DUE TO A SHORT! 

Liars....

So...today I took it to a local Sew n' Vac shop to get it repaired per the recall.

I walked into the shop and was "greeted" by a grey haired man. I use that term loosely because to me the word "greeting" sounds cordial. He wasn't.

Here's how our conversation went (roughly).

Me: Hi, I brought my vacuum in because there is a recall and my vacuum isn't working most likely due to the bad part.

Mr. Jerky Vacuum Man: Hmm...Let me see.  Why isn't the cord wound up?

Me: The rewinder is broken. My son broke it.

Mr. Jerky Vacuum Man: Your SON broke it?
Look at that little angel...wearing my glasses and holding my kindle!


Me: Yes, he's 2.  I can't stop him from playing with it.

Mr. Jerky Vacuum Man: What do you mean you can't stop him? You're the MOM.

Me: (Doing my best to ignore that snide comment) Yep. The last time I buy an automatic rewinder.

Mr. Jerky Vacuum Man: What is this tape on the cord.

Me: Oh. My husband put that there. There is a nick in the cord so he put that there.

Mr. Jerky Vacuum Man: (Scoffs). And you think that the recalled part is the issue???

Me: Well, it worked perfectly fine up until last week.

Mr. Jerky Vacuum Man: Well, I guess I can try to turn it on.

Me: It won't work. It doesn't have any power.

Mr. Jerky Vacuum Man: (Plugging it in). We'll just see. (Presses button).

Loud "POP" comes from vacuum. Breaker flips. 

(In my defense, I told him it wouldn't work.)

Mr. Jerky Vacuum Man: Did you hear that!?!?!?!??!

Me: Yes. It didn't ever do that before though.

Mr. Jerky Vacuum Man: This is NOT a recall issue. You just need to buy a new vacuum.

Me: Yeah, I was afraid of that. I will just have to look for a new vacuum in the near future.

Mr. Jerky Vacuum Man: HELLO! You're IN a vacuum store.

Me: (Thinking again how rude this guy is...does he not realize that I know where I am?) Well, I can't AFFORD a vacuum right now. You know with CHRISTMAS and everything coming up!?!?!?

Him: I guess I can understand that. Makes sense.


Lovely, right?  I know that my vacuum has possibly been through the ringer, but I really do believe (and so does the Favorite) that it has to do with the recall.  Considering that the cord has been tugged a little too hard by small hands and all. Here is what the recall says:

"Hoover, Inc. has voluntarily alerted the Consumer Product Safety Commission (CPSC) of a possible defect that could pose a safety hazard in select models of the WindTunnel T-Series family of upright vacuums. Hoover will repair the vacuums with a new cord rewind assembly at no charge to you. Please watch the video to see if your unit is affected.

POTENTIAL HAZARD

This alert is limited to select models of the Hoover® WindTunnel T-Series™ Bagless Upright vacuums. Specifically, models with the cord rewind feature, which is designed to retract the power cord for storage. Some of the power cords may not be routed properly or securely seated in the cord rewind assembly. Power cords could be pulled loose, causing a potential fire or shock hazard. To date, there have been 3 reports of minor burns to carpet and furniture, and 1 report of a minor burn to the hand, which did not require medical attention. Hoover®WindTunnel T-Series™ Bagless Upright vacuums without the Cord Rewind Feature are NOT affected."

Hoover's website continues that they will repair the cord rewind assembly at no cost to you. That's all I ask. That it be repaired. It may not fix the issue, but for pete's sake honor my recall man!

But honestly...you expect me to buy a vacuum from you after insulting my parenting skills and acting like I was an idiot? Dream on.
Toilet paper CAN be an outfit! 
I can buy a vacuum from a lot of other places.  You will NEVER have my business, sir! And, I will definitely NOT recommend your store to anyone.